Email Builder for Ticket Events
TicketSignup's free email marketing platform has an Email Builder to quickly design beautiful campaigns to sell tickets, send event information, and connect with your potential attendees..

You can create your email from scratch, choose from one of our predesigned default templates, or bring in your own HTML.
Start An Email
First, you will navigate to Email >> Send Email to configure general settings and choose your recipients.

You can designate which type of email you are sending by choosing either marketing or transactional. Separating marketing and transactional emails allows you to send marketing emails that people can unsubscribe from while ensuring that they are not unsubscribed from important event details (like where to park at your festival).

Next, you will choose your recipients. You can upload custom lists of contacts (such as previous donors and event attendees), select a default list (such as “All Ticket Purchasers”), or combine custom and default lists for a dynamic recipient list.
Then, you will add a custom subject line. Be sure to follow best practices by keeping it short, making it descriptive, and limiting punctuation.

Click on the blue “Create E-mail” button to go to your email’s design board.

You will be taken to the first step of our Email Builder page where you can create or choose a design. Within the first tab, System Templates, you will choose between three options for creating your email:
- Start From Scratch
- Basic Template
- Use Your HTML
We cover each of those scenarios below.

Note: There are two tabs on this screen: System Templates contains the three options above for creating an email and a second tab that will house your saved templates while Your Saved Templates houses your saved templates.
Create an Email: Start From Scratch

You will be taken to your email’s design board where you can add sections and content. Your board starts you out with the basics: color branding, header, and footer. Between the header and footer is where you will add sections to display your content.

Customize Color. Click on the actual color block beneath the Theme Color header. You can click on a color, use the color picker, or enter RGB, HSL, or HEX color codes. Buttons and section backgrounds will be based on this color that defaults to Color 1 of your ticket event website’s Event Theme.


- Customize Header. The email header defaults to your event’s logo and event name. To edit the header and swap out the image and text, click on the cog icon at the top right-hand corner of the header section.

You have the ability to upload a new image (square images are best to fill the available space) and the text that appears below the image. Both the image and title are required for the header.

- Customize Footer. Like the header, the email footer defaults to your event’s logo and event name. To edit the header and swap out the image and text, click on the cog icon at the top right-hand corner of the header section. To delete the image, click the trash can icon.

You have the ability to upload a new image (as with the header, square images are best to fill the available space) and the text that appears below the image. Only the text is required for the footer — including an image is optional.

Add a Section
To begin adding content to the body of your email template, you’ll first need to add a section that will house content blocks. Click on “Add Section to E-mail” in either the sidebar or within the email body itself.

You’ll have the option to choose between one or two columns for the section.

One Column
Two Columns
Add Content to Sections
Whether you choose one or two columns, a pop-up box will appear.

From this pop-up, you can add several types of content to an email section. All content types can be utilized with a single or double-column section:
- Text
- Feature 1 (text + button, dark background)
- Feature 2 (text + button, white background)
- Image, Text, Button
- Button
- Image
You can include multiple content blocks within each section. Click on the plus symbol within the section to bring up the “Add Content” pop-up or click on the type of content block you want inside of the sidebar on the right of your screen. You’ll notice that the section you are adding content to is framed for easy identification.

Add Text
Text content blocks give you the ability to add a header and body text using our rich text editor.

Use data replacement tags to personalize your emails and show your understanding and appreciation of your supporter’s relationship with your event and organization.

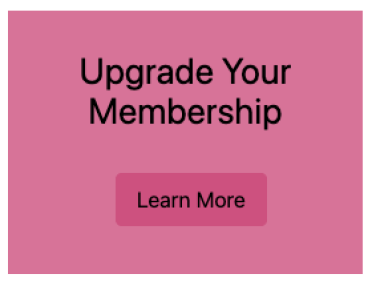
Add Feature 1 (Text + Button on Dark Background)
Feature 1 allows you to group a text heading and action button together inside of a colorful box.
The heading text, call-to-action button text, and the call-to-action button URL can be updated here. Click the gray Update button to update the settings.

Add Feature 2 (Test + Button on White Background)
Feature 2 allows you to group a text heading and action button together inside a white box with a colorful button.

The heading text, call-to-action button text, and the call-to-action button URL can be updated here. Click the gray Update button to update the settings.


Add Image, Text, Button
Image, text, and button content blocks allow you to organize three elements: an image, text, and action button together into one group. Upon adding, a pop-up will appear in which you will be prompted to choose your image and how you would like it to be displayed within the email (center or left).

Once your image has been selected, a photo editing tool will allow you to crop the image, rotate it 90-degrees, reset it with a new image, and again choose between centering or left-justifying the image.

Note: You can only crop and rotate the image during the initial selection of the image. If you would like to reconfigure the image after adding it, you will need to re-add the image and repeat the cropping and rotation edits.
Once the image is updated, you can edit the heading and text by clicking into each and typing within our rich text editor.

The edited image, text, button section will look as follows:

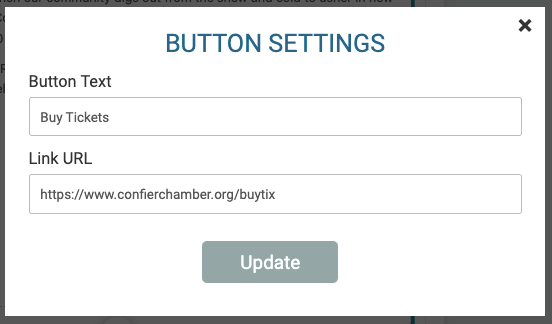
Add Button
Upon selecting the button content, a placeholder button will display. To change the display position (center or left) of the button, click on the cog icon.


To update the button text and URL, click on the button itself and the settings pop-up will appear:

You can include up to five buttons within one section. To add a new button, click on the blue plus sign next to the existing button.

Another placeholder button will appear. Click on the new button to edit the button text and link.

Add Image
Upon adding, a pop-up will appear in which you will be prompted to choose your image and how you would like it to be displayed within the email (center or left).

Once your image has been selected, a photo editing tool will allow you to crop the image, rotate it 90-degrees, reset it with a new image, and again choose between centering or left-justifying the image.

Note: You can only crop and rotate the image during the initial selection of the image. If you would like to reconfigure the image after adding it, you will need to re-add the image and repeat the cropping and rotation edits.
Rearrange and Delete Sections and Content Blocks
Icons within each section and content block allow you to reorder or remove them.

Warning: If you delete a section, the content you added to the section will also be deleted.
Ready to Send? Once you have finished designing your email, preview your email and send.
Create an Email: Basic Template
To give you a head start and make things as easy as possible, our team has curated several basic templates that will function well for simple and specific communications. At the time this blog was published (January 14, 2022), we have one basic template available. To access it, you will follow the steps outlined in the “Start an Email “section above. Next, you’ll select the “Basic Template” option from the design choices.

After the jump, you will see some default sections and content prepopulated for you to customize. This initial basic template provides a quick way to design an email communication with basic information and one or two calls to action.

You can elect to keep the design as is or add additional sections and content to enhance its design.
Ready to Send? Once you have finished designing your email, preview your email and send.
Create an Email: Use Your HTML
If you have designed an email template using another tool, you can export the html code and use it to build your template in Email Builder. First, you will follow the steps outlined in the “Start an Email” section above. Next, you’ll select the “Use Your HTML” option from the design choices.
In the Email Builder design board, you have two places where you can input your html.

Ready to Send? Once you have finished designing your email, preview your email and send.
Preview Your Email
At any point during the design of your email, you can view a preview by clicking the “Preview E-mail” link.

You can toggle between mobile and desktop views. If you want to make additional edits, hit the “Back to E-mail Builder” link at the top left-hand corner. If you are ready to continue with sending, click the “Save” button at the top right-hand corner.

Send or Schedule Your Email
Once you have finished adding sections and content blocks, or inserted your custom HTML and are ready to send, click “Save” at the top right-hand corner of the email builder screen.

You will be taken to one last preview. If all looks good, click on the Review E-mail button at the bottom of the page.

The “Confirm E-mail” screen provides you with:
- Summary of the basics: subject line, email classification (marketing or transactional), from email address, and the reply-to address)
- Recipient lists — you can expand this to see a count of the total estimated recipients

You will then indicate whether you would like to send the email now or schedule a date and time in the future.
At the bottom of the page, you have the ability to input default values for your data replacement tags. For example, if a first name is missing for a supporter in your database, the word “Friend” can be inserted into the email in its absence. The final step to send the email is to click the “Confirm E-mail” button.

You will then be taken to a summary page with a confirmation message that the email was successfully sent or scheduled.

Email Templates
We’re also excited to announce the ability to save templates featuring these dynamic new email layouts that can be used for future communications and campaigns. Consistently using these email templates will strengthen your nonprofit’s brand and organization while saving you time and money.
Navigate to Email Templates
From your event dashboard, go to Email >> Email Templates or do a quick find by typing “email templates” in the menu search bar at the top left-hand corner of your screen.
Create New Email Template
Click on the blue “Create New Template” button.

You will be taken to our Email Builder design board where you can build your email template.
Designing a template is exactly the same process as described in the “Start From Scratch,” “Basic Template,” and “Use Your HTML” sections above. You have all three methods available to create and design your template.

After your design is complete, click “Save” and name your new template.

Access and Use Your Saved Email Templates
Go to E-mail >> E-mail Templates to access your saved email templates. Template names are in turquoise blue.

From this page, you can send an email using the template, editing the template, or copying the template to save time and create a new version based on the original.


You can also use a saved template by navigating to E-mail >> Send E-mail and clicking on the blue “Create Email” button under Content.

On the design options page, you will click on the “Your Saved Templates” tab and select the template you would like to use.

The Email Builder design board will open and your template’s content will be prepopulated. You can then revise the existing sections and content blocks, or add new ones.
What’s Coming Next
TicketSignup's free email marketing platform is purpose-built for events and helps your organization save money and build better emails for your ticket events. We are continuing to add more features and functionality to TicketSignup's free email marketing to offer our customers a free alternative to costly email marketing platforms with several significant advantages:
- Free
- Unlimited contacts, contact lists, and emails sent
- Easy-to-send emails to lists based on TicketSignup reports (e.g., current attendees)
Easy-to-generate dynamic emails with data directly from TicketSignup — not just first name but specific information, like links to photos and QR codes for tickets to the festival, etc. - Integrated tracking to the individual supporter level — being able to see who opened an email and who bought a ticket based on that email